A few days back one of my favorite blogger – Michael Webster, wrote about vSphere Singe-Sign On and some best practices around it. Interestingly, the title he chose for this article was “Disabling vSphere 5.1 Single Sign-on (SSO) – Don’t do it!”
Well, even before reading the
article, I knew why he chose that title. Being into the field where we design
and implement vSphere stacks for customers, a lot of them who do not see a use
case of SSO in there environments ask for ways to DISABLE it completely and
deploy the vCenter as they always have with the previous versions of vSphere.
Remember, vSphere Single-on (SSO)
is introduced with vSphere 5.1 hence it is the latest enhancement which is also
a compulsion or a pre-requisite to install vCenter software. I will not talk
about what it does as there are more and enough resources which tell you what
is VMware SSO and how it helps. In my opinion, here are the best articles which
explain the features and functionality of SSO like no one else.
ü
vCenter Single Sign-On Part 1: what
is vCenter Single Sign-On? – By
Justin King.
ü vCenter Single Sign-On FAQ (2034918) – VMware KB
Now that you have read those
articles and know why VMware introduced Single Sign-on, the purpose behind
writing this article is to give you a step by step guideline to deploy SSO.
There are a number of such articles available which talk about how to deploy
SSO with different scenarios, however with this post I wanted to take the
simplest method of all and help people with all the steps from pre-requisites to installation and finally winding up with
configuration of SSO. This is specifically for someone who wants vCenter
5.1 without SSO or I should say to install vCenter 5.1 without going through
any pains while configuring SSO.
To keep it simple, I will define
what all I have in terms of Database, AD Integration, Access rights etc, and
then write this post in 4 parts. However, I will not break this into multiple post as I want you to use this as a single reference document without have to jump around much.
vSphere 5.1 Single Sign-on (SSO) - Deployment & Configuration Made Easy!
Part 1 - vSphere 5.1 Single Sign-on (SSO) - Preparing for installation.
Part 2 - vSphere 5.1 Single Sign-on (SSO) - Installing SSO, Inventory Service and vCenter Server.
Part 3 - vSphere 5.1 Single Sign-on (SSO) - Bare minimum configuration of SSO for you to get started with vCenter 5.1.
Part 1 - vSphere 5.1 Single Sign-on (SSO) - Preparing for installation.
Part 2 - vSphere 5.1 Single Sign-on (SSO) - Installing SSO, Inventory Service and vCenter Server.
Part 3 - vSphere 5.1 Single Sign-on (SSO) - Bare minimum configuration of SSO for you to get started with vCenter 5.1.
Let’s start with looking at the basic
architecture, requirements and assumptions for this deployment.
vCenter Architecture Components & Requirements:-
i)
vCenter Server 5.1 b (This is the latest at the
time of writing this article and as per the release
notes a lot of SSO bugs are fixed with this release.)
ii)
SQL Server 2008 R2, Standard edition for SSO, vCenter and Update Manager
Databases.
iii)
A group in active directory with users
configured. This would be the first
group which would be added to the vCenter and SSO for Administrator access to
vCenter. Please plan this carefully and make it ready. You can add multiple such groups with different
privileges at a later stage.
iv) A simple install of SSO would be done on the vCenter Server itself.
Assumptions while writing this article:-
Ø
This is a fresh install of vCenter 5.1 and not
an upgrade.
Ø
The process of creating the DB for vCenter and
Update Manager is not included as it is the same as previous versions.
Let’s begin the joyride....
Part 1 - vSphere 5.1 Single Sign-on (SSO) - Preparing for installation.
Part 2 - vSphere 5.1 Single Sign-on (SSO) - Installing SSO, Inventory Service and vCenter Server.


2- Click on Administration under the Home menu.
3- Click on SSO Users & Groups to add the Group which we created for VMware Administrators as the Principal Group to the SSO Administrators.

4- Select the Administrators Group and click on Add Principal

5- Search for the Domain Group which you created earlier and add that as a Principal (domain\VM-ADMIN)

6- Now that the users are added, let us go ahead and ease out the SSO Policies. Click on Configuration and then Policies.

7- Click on Password Policies and click on Edit to change them as per your wish. The screenshot below shows what I have selected for my environment.


7- Click on Lockout Policies and click on Edit to change them as per your wish. The screenshot below shows what I have selected for my environment.


8- Click on OK to confirm the changes.
You are done now :-) The entire process takes around 2 hours to get everything up and running. Hopefully, this will help you avoid all those NASTY issues you have read about and have you vCenter 5.1 with SSO production ready.
Part 1 - vSphere 5.1 Single Sign-on (SSO) - Preparing for installation.
1- Prepare a Virtual Machine or a Physical Server on which you will install vCenter. (Virtual Preferred – see why?)
2- Install the Windows Operating System you desire to and configure the Drive Partitions as per your vCenter Server Low Level Design. (Refer to the following KB from VMware to make sure you meet the pre-requisites)
3- Create the vCenter and Update Manager Databases and Desired users either manually or using the scripts in the installer folder. This process is same as previous versions so no twists here. Some use the scripts and some DBAs want everything controlled by them and they do it manually. (Refer to the Following Document if you have not done this before)
Note: - Although you can refer to the above document for SSO DB creation as well, however I would recommend you do it as described below.
4- For creating the SSO Database on SQL run the following Script from SQL Query window in SQL Management Studio. Few things to note here.
i) Do not copy the First and the Last Line which denote the start and end of script. Copy the rest of the script and paste it.
ii) Line 3 has the PATH for SSO Database file to be located on C:\. Change the drive letter to a desired partition which you have on vCenter Server for storing databases, i.e. D:\ or F:\ etc.
iii) Repeat step (ii) on Line 7 for Index file creation and Line 13 for transaction log.
++++++++++++++++START OF SCRIPT+++++++++++++++++++++++++++++++++++++++
CREATE DATABASE RSA ON PRIMARY(
NAME='RSA_DATA',
FILENAME='C:\Program Files\Microsoft SQL Server\MSSQL10_50.MSSQLSERVER\MSSQL\DATA\RSA_DATA.mdf',
SIZE=10MB,
MAXSIZE=UNLIMITED,
FILEGROWTH=10%),
FILEGROUP RSA_INDEX(
NAME='RSA_INDEX',
FILENAME='C:\Program Files\Microsoft SQL Server\MSSQL10_50.MSSQLSERVER\MSSQL\DATA\RSA_INDEX.ndf',
SIZE=10MB,
MAXSIZE=UNLIMITED,
FILEGROWTH=10%)
LOG ON(
NAME='translog',
FILENAME='C:\Program Files\Microsoft SQL Server\MSSQL10_50.MSSQLSERVER\MSSQL\Data\translog.ldf',
SIZE=10MB,
MAXSIZE=UNLIMITED,
FILEGROWTH=10% )
GO
-- Set recommended performance settings on the database
EXEC SP_DBOPTION 'RSA', 'autoshrink', true
GO
EXEC SP_DBOPTION 'RSA', 'trunc. log on chkpt.', true
GO
CHECKPOINT
GO
++++++++++++++++END OF SCRIPT+++++++++++++++++++++++++++++++++++++++++
5- Now that the database is created lets create the users required for SSO Database using the following script. Few things to note here.
i) Do not copy the First and the Last Line which denote the start and end of script. Copy the rest of the script and paste it.
ii) On Line 3 and Line 5, change the password as desired; I have set it as VMw@re. DO NOT CHANGE THE LOGIN names of RSA_DBA and RSA_USER else SSO will not work.
++++++++++++++++START OF SCRIPT+++++++++++++++++++++++++++++++++++++++
USE MASTER
GO
CREATE LOGIN RSA_DBA WITH PASSWORD = 'VMw@re', DEFAULT_DATABASE = RSA, CHECK_POLICY = OFF
GO
CREATE LOGIN RSA_USER WITH PASSWORD = 'VMw@re', DEFAULT_DATABASE = RSA, CHECK_POLICY = OFF
GO
USE RSA
GO
ALTER AUTHORIZATION ON DATABASE::RSA TO [RSA_DBA]
GO
CREATE USER RSA_USER FOR LOGIN [RSA_USER]
GO
CHECKPOINT
GO
++++++++++++++++END OF SCRIPT+++++++++++++++++++++++++++++++++++++++++
Assuming that till this point you do not have any errors. If not, then you are done!! The preparation part is over.
Now let us move to Part 2 which of Installation of vCenter.
Part 2 - vSphere 5.1 Single Sign-on (SSO) - Installing SSO, Inventory Service and vCenter Server.
- Login to the VM on which you need to install the vCenter.
- Create an ODBC for vCenter and Update Manager (Use 32 bit DSN for Update Manager located under the following directory in that VM - %windir%\SysWOW64\odbcad32.exe
- Mount the vCenter Installer ISO on this machine.
- Launch the Installer Menu by clicking on Autorun.
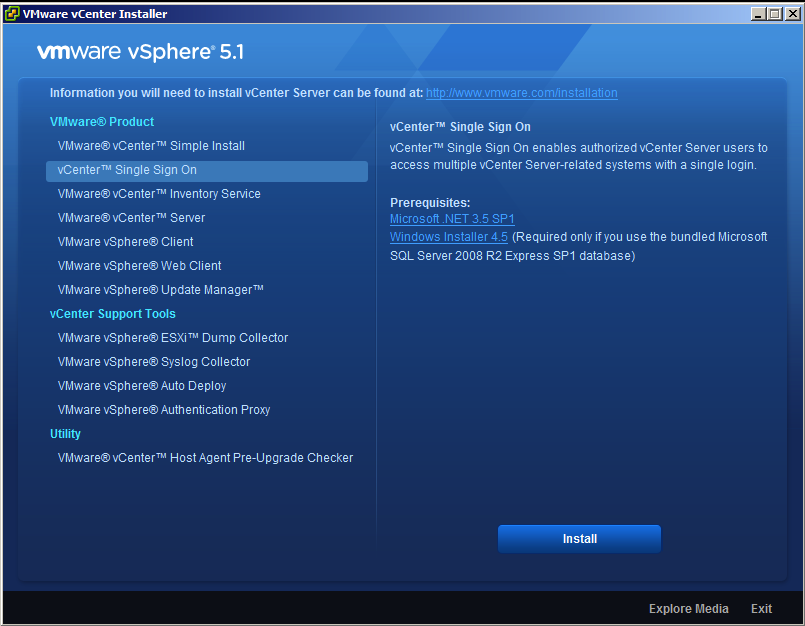
- Select vCenter Server Single Sign on and click on Install.

- Select the desired installation language and hit OK
- Click next to start the Single Sign On Installation Wizard'
- Accept the agreement and click next
- Choose the “Create the primary node for a new vCenter Single Sign On installation” as this is the first vCenter Single Sign On instant & Click Next.
- Install Basic vCenter Single Sign On.
- Fill the admin@System-Domain password then hit next. Note – This password should have atleast 1 Upper Case Letter, 1 Number and one special character. You should note this down and keep it in your bosses’ locker. NEVER FORGET IT.
- Choose “use an existing database”.
- Fill the database information with the earlier created databases info as shown in the below screenshot. This includes all the information which we used to create the RSA Database, Users and Passwords in PART A of this article. DO NOT change anything here apart from the Host Name. Your window should look exactly like mine here.
14. Fill the fully qualified domain name of your SSO server name and hit next.
15. Choose the SSO installation destination folder and hit next.
16. Confirm the https port to be used by SSO and hit next.
17. On the Ready to Install screen hit install to start the installation.
18. On the SSO installation completion screen hit finish and then if the VMware Single Signle Sign on Service has started or not.
If you are following me closely then you should have a started service without any issue and this marks the end of SSO installation. Read on, the configuration is still left :-). Time to install Inventory Service now.
- Select VMware vCenter Inventory Service from the VMware Product Installers menu and click Install.
- Select the setup language and click OK.

3. After the Welcome screen is displayed, click Next
4. Accept the agreements and hit Next
5. Choose the installation Destination folder and hit Next
6. Fill your vCenter Server FQDN and hit next
7. Confirm the ports to be utilized by vCenter Inventory Service and hit Next.
8. Select the inventory size that best describes your vCenter Server deployment and hit next.
9. Enter the SSO Administrator password (It's in your bosses' locker in case you forgot the password :-) ) to register Inventory Service with vCenter Single Sign On.
10. Hit Install Certificates when prompted.
11. On the ready to install page hit install.
Now we are getting closer :-)
Okay, now is the time for vCenter Install. It is exactly the same as you did it before,but let me take you through this and I will post the important screenshots in this article to make sure you are going in the right direction.
1. Launch
the installer using an account with administrator privileges.
2. Select
vCenter Server from the VMware Product Installers menu and click Install.
3. Select the setup language and click OK. Wait
while the installation process begins.
4. After the Welcome screen is displayed, click Next.
5. On the End-User
Patent Agreement screen, click Next.
6. On
the License Agreement screen, select the
radio button to accept the terms of the license agreement, and click Next.
7. You
can enter a License key for ESXi now, or
you can enter it later. The system can run in evaluation mode for 60 days.
8. Use an existing
supported database and specify an appropriate ODBC Data Source Name. Click Next.
9. Specify
the account to be used by the vCenter Server Service. Select Use SYSTEM Account (default), or deselect it and
specify another local or domain account name and password (if needed). Click Next. To specify a domain account, precede the
account name with the domain name and a forward slash (/) as in: domain_name/account_name.
10. Select Create a standalone VMware vCenter
Server instance (default) to install either a
standalone instance of vCenter Server or the first in a series of linked
vCenter systems.
11. Confirm
the ports to be used by vCenter Server and click Next.
12. Choose
the size of your environment
13. Complete
your Single Sign On and Lookup Service information and click Next. (Time to peep into the bosses' safe)
14. Register
a vCenter Server administrator user or group with vCenter Single Sign On. This is the group which will automatically get added to SSO.
***This means all the users which are a part of this group in the AD would be Administrators on the vCenter Server. You can later add mode groups depending on your use case.
15. Click on Next on the vCenter Inventory Service Information. (Leave the defaults)
16. Select vCenter Installation Destination Folder
17. Hit
install to start the installation.
18. Hit
finish to exit the installation wizard
We are done with the complete installation now. Lets just move and
and configure the SSO in the simplest possible manner and start using this
vCenter and the awesome features which vCenter 5.1 gives you.
Part 3 - vSphere 5.1 Single Sign-on (SSO) - Bare minimum configuration of SSO for you to get started with vCenter 5.1.
Assuming you have installed the vSphere Web Client from the same bundle, let us go ahead and do some configurations on the SSO server.
1- Launch the vSphere Webclient. So if the web client is on the vCenter Server. Simply launch https://vcenterip:9443/. This should launch the login page. Use the SSO Admin credentials to Login.

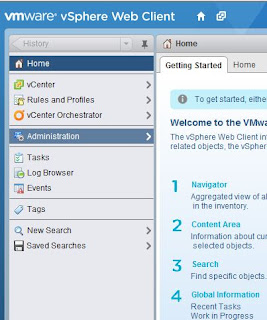
2- Click on Administration under the Home menu.

3- Click on SSO Users & Groups to add the Group which we created for VMware Administrators as the Principal Group to the SSO Administrators.

4- Select the Administrators Group and click on Add Principal

5- Search for the Domain Group which you created earlier and add that as a Principal (domain\VM-ADMIN)

6- Now that the users are added, let us go ahead and ease out the SSO Policies. Click on Configuration and then Policies.

7- Click on Password Policies and click on Edit to change them as per your wish. The screenshot below shows what I have selected for my environment.


7- Click on Lockout Policies and click on Edit to change them as per your wish. The screenshot below shows what I have selected for my environment.


8- Click on OK to confirm the changes.
You are done now :-) The entire process takes around 2 hours to get everything up and running. Hopefully, this will help you avoid all those NASTY issues you have read about and have you vCenter 5.1 with SSO production ready.