Wednesday, January 14, 2015

Part 10 : Reviewing the Global Settings in vRealize Operations Manager!

As a part of the series I am doing on vRealize Operations Manager, I thought it would be useful for readers to know about the Global Settings parameters you can now change from the GUI. These settings were available (most of them) with the previous release known as vCenter Operations Manager, however now these settings are a part of the GUI which makes them easily accessible and configurable.

Through this post, I will tell you about these settings and the various parameters you can tweak and a quick overview of how these parameters can help you customize your vRealize Operations deployment.

So to begin with, let's look at where these settings are located in the GUI of the Product UI:

Launch the Product UI and click on the Administration Icon and then Global Settings on the left pane.


Once you click on the Global Settings, you will see a list of parameters which can be highlighted and edited by clicking on the "pencil" icon.


The description field on the right gives you a complete view of the effects of changing these settings.


When you click on the edit button, you will get an opportunity to modify all the parameters at once.


Unlike the previous release, you can now change the timeouts, data retention and historical events right from this screen, which in my opinion is a great little enhancement to this new release. To top it all, you no longer have to bump up the services for any of these settings to take effect.

Hope this helps....


Share & Spread the Knowledge


Tuesday, January 13, 2015

OnePlus One Review : Things I like the most!!

With the buzz in the air around the "Flagship Killer" phone I was pretty interested in following the developments around the OnePlus One. The phone was recently launched in India and sold through Amazon India. Just a couple of days back, I received an invite from my colleague and within minutes, I ordered the phone. A lot of my Twitter & Facebook buddies have been asking for a review on the phone. 

So here is the review, infact a VIDEO review which I am not great at.. But yeah, I guess it will give you my view of the phone... Enjoy!!


Leave your comments if you want to share your OnePlus One story :-)


Tuesday, January 6, 2015

Part 9: Exporting & Importing Policies with vRealize Operations Manager 6.0

With the release of vRealize Operations Manager 6.0, VMware has introduced a much required feature into the product which allows you export policies created in your vROps 6.0 instance and import them back into the system as and when you need them.

This feature was in constant demand with vCOps 5.x, however was never possible with that version. Their could be multiple use cases for which you might want to export or import policies. Some that come to my mind are Backup & Restore, distributing policies across multiple instances within an organization, programmatically make changes to policies and injecting them back into the system and many more. The export and import options are right on the GUI itself which makes it even more simpler.

Let us quickly dive into my lab through screenshots and see how you can do this:

  • Login to and node of vROps 6.0 cluster deployment. (If you have a standalone deployment then that's the node you want to login to. Remote collectors do not have these policies hence do not login to them, instead chose a Master, Master Replica or a data node. Please use credentials with appropriate permissions.

  • Click on the Administration Icon and click on Policies.          

  • Click on the Policy Library and then select the policy which you wish to export and click on the Tool icon highlighted in the screenshot and click on EXPORT. This can be saved as an XML file and later imported back when you need it.


If you are curious, open the xml file and you will notice that the entire policy can be edited in the xml format and then imported back into the same system. I can see Alan Renouf writing scripts against the policy engine to customize the policy from 3rd part tools and interfaces. With his experience and creativity may be has some more great ideas.

You can just import the xml using the same options and it will give you the policy back into your vROps instance. Please ensure that you enable the policy by attaching it to a group or the entire universe. Once you do that, the policy would be reflected under the Active Policies. Here you can rank the policies just like the old vROps days. Rank 1 will have a higher priority while the default policy will have a rank of D. Look at the screenshot here which shows a policy I have just made active:


With this I will close this article and hopefully this gives you an insight on how you can play around with policies on vROps 6.0. See you soon with my next post!

Till Then...


Share & Spread the Knowledge 


Monday, January 5, 2015

Part 8 : Exploring Policies in vRealize Operations Manager 6.0.

Let me start by sending a lot of best wishes your way this new year. 2014 was rocking and I thank my family, friends, colleagues and readers for making it a special year for me. As I step into this new year, I look forward to more exciting times in my personal and professional life. As always, I am up for it so BRING ON 2015 :-)

The series on vRealize Operations 6.0 is shaping up well and this post is a continuation to the process. A few days  back I did a post on configuring policies on vCenter Operations Manager and with this post, I will give you an insight on how policies work in vROps 6.0. In my post on configuring policies, I mentioned that the configuration options in vCOps 5.x and vROps 6.o will remain the same. While this is true, the policies with vROps 6.0 are more granule and can be configured individually for almost every object type in (aka Resource Kind in vCOps 5.x) the inventory. Without further ado let's jump into the policies in vROps.


Once you are logged on to the Product UI, click on the Administration Button on the navigation button. Since the interface is new, let me help you with a few screenshots :-)


Under Administration click on Policies.


Once you click on Policies, you will straight away see the list of Active Policies, in this case, I just have a default policy which is active. At the bottom of this pane you can also see the groups which are associated with the policy. You also have the option to add a specific group to the policy if you wish to.


If you wish to see the list of all the policies or edit a policy, you would need to click on the Policy Library button highlighted here.


As soon as you get here, you might see different options as compared to what I have here. I have migrated the policies from my old version of vCOps 5.x using the migrate data option and hence I see all the policies from my previous version. This window will also list the policies for any 3rd party management pack which you might have installed. Each of these management packs will come with their own policies and they will be populated on this screen as soon as you apply them. You will also get a set of canned policies here which you can pick and modify from this page and apply at the Universe level or to a specific group.

Now let's learn to edit a policy. You can see in the above screenshot, that my currently Active Policy called Default policy is also highlighted here. Lets click on that and click on Edit.


As soon as you click on the edit button, you will be taken to a new screen from where you can edit various aspects of the policy. Let us look at a screenshot and see the list if things we can do with a policy.


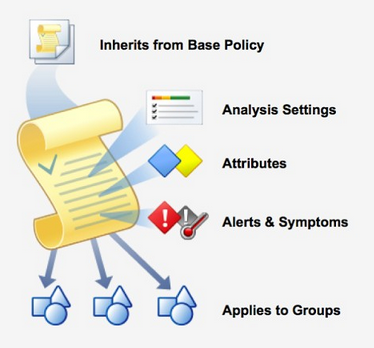
You will notice that we have 6 Tabs on the left side of this window which I have highlighted in Red. Let me give you a quick overview of each of these Tabs and we will do a deep dive into each of them in the posts to come in this series. Let me do that clicking on the green color "+" symbol to start with creating a new policy

1. Getting Started - With this tab you can configure 3 things, Name of the Policy, Description and Start with Policy. Start with basically allows you to pick a pre-canned policy and use the same as the base. This will automatically fill all the values for you based on the canned policy and then you can override them if you wish to. Here is a screenshot which shows this area and a sample done for your reference.


2. Select Base Policies - This screen allows you to chose the Object Type for which you want the policy to be applied. This is one difference between the old and this release. Here you can setup a policy for Just Clusters or Virtual Machines or for everything by either using the filter or clicking on All object types. You also have the option to add an object type manually if you wish to create one.

Let's have a look at the screenshot to list all the Object Types for which we can change/update this policy for:


For ease, let us click on all object types and add all the objects. Once we do that we will have all the settings listed in the middle of the screen under the head "Configuration inherited from base policy" you can scroll down and see all the settings and configurations such as badge color thresholds, capacity & time remaining settings etc. Here is how it looks like.


You will be wondering that why I am unable to make any changes to the settings here, for instance, changing the Anomaly Threshold by using the slider as it was done in the previous release. In  order to make changes to the policy or override the settings of a policy you need to go the next option called Override Analysis settings.


3. Override Analysis Settings - Here you can chose an object type for which you want to override or change a particular configuration within a policy. Please remember that by default all the configurations are locked and to edit them you need to click on the unlock button to change that config. I have highlighted the buttons here in RED for you to find them on the screenshot. So post making a change lock that configuration and then save it.


4. Override Attributes - This option allows you to do 3 things. You can enable or disable a metric or a supermetric, change KPI settings for metrics or enable / disable or change the property of an object or object type. You would hardly need to make any changes here, unless you are writing new super metrics, which you need to enable from this page for vROps to start collection.


5. Override Alert / Symptom Definitions - This is where you get to define the alerts. This option allows you to enable or disable alerts for objects and also make changes to the symptoms which make up the alerts. This is how this section looks like:


6. Apply Policy to Groups - With this option we will apply the created policy to a specific group or the entire Universe and then click on Save.


With this you now have a fair understanding on how to create a new policy on vRealize Operations Manager 6.0. In the forthcoming articles, I will dig down further into various sections of the policy to help you configure the same as per the requirements of your environment.

Till Then...


Share & Spread the Knowledge